Adding / Editing Media
Contents
Images and Media Objects
Media traditionally referred to the form, rather than content of a work of art. Canvas or paper are the media which convey a painting or a story. Recently, however, the word is also used to designate the content: both "file formatted as jpg" and "Photo of my aunt Matilda" can be designated as media. To add to confusion, PGV stores pictures in "Media Objects" which are sometimes referred to as media as well (see article discussing top level Gedcom objects). In the following we will try to distinguish Media (generic name: Photo of my aunt Matilda) from Media Files (any file that contains something worth showing, for example My_Aunt_Matilda.jpg) from Media Objects (a Gedcom object with ID=M123 entitled Aunt Matilda in a baby carriage).
Media Objects
PGV version 4 and higher includes Media Objects as separate entities. Media (photo, film, voice recordings etc.), stored on disk as Media Files are attached to Media Objects, and those are referenced wherever media are called for. A Media Object has the following attributes:
- ID
- Unique ID within a single Gedcom. When you add a new Media Object, its ID is assigned automatically.
- File name
- The Media File name. The file names have must be unique within a directory on the server, and there can be many subdirectories. PGV actually manages two files with the same name, original file and the reduced-size thumbnail in a subordinate directory.
- Directory on the server
- The file location on the server. If the administrator allowed, you can select from available directories
- Format
- Format of media, specified as file extension. PGV understands many media formats, and can display images, sound files, moovies etc.
- Type
- Optional, but possibly useful. You can select from a list, e.g. photo, document, certificate etc. Paintings are not included, but you can add it and any other type by editing the Gedcom fragment manually.
- Title
- Title should be short, since media are sorted and displayed by title - typically one line. You can put more data in Notes
- Note
- The extended description of the media goes here: who, where, when, etc.
- Source
- Like in all other objects, Source is and important piece of information, and should always be added if known.
Media Objects can be referenced in more that one place, for example a single group picture (single media object) can be linked to all persons visible on this picture.(TBD)
Adding and Managing Media Files
You can add (Upload) one or many Media Files to the server using the Upload Media files function, or you can add Media to top level object of event, by simultaneously creating a Media Object and uploading Media File. You can also rename and delete a Media File that already exists on the server.
Uploading Media Files
When you have a number of files, it may be useful to upload them using the Upload Files facility. In this case you are only copying the files to the server, without creating the corresponding Media Objects, which must be done later. Select the MyGedView Portal menu, Manage Media submenu, Upload Media files function. The form allows you to upload multiple files.
- Media file to upload - file on your computer (browse or type the file path)
- Automatic thumbnail - recomended for image files. See Thumbnails below
- Thumbnail to upload - some files, e.g. pdf's, will not generate a thumbnail. You can make one yoursef and use it here.
- File name on server - you can immediately rename the file, useful if your file has a long or uninformative name.
- Folder name on server - root (media) or a subolder if so configured.
Adding Media
The alternative way of adding files is to use the Adding Media Objects functionality, which allows you to add a file and to create a Media Object at the same time. This functionality is described below.
Managing Media Files
You can delete, rename and move a Media File. Be forewarned, that deleting files works differently from deleting Gedcom entites - the action is immediate, and the "Approve Edits" does not work here.
- Delete
- To delete a file find the Media File or Media Object in the Manage Media screen. There is a "Delete file" item, which deleted both the original file and its thumbnail version.
- Rename
- You rename file on the Media Object editing screen, which displays the file name. Change the file name and save; if succesful the Media Object is now linked with the new file. To see the result, the changes must be approved. If you attempt to rename a "naked" Media File, PGV will create its associated Media Object.
- Move
- Do not attempt to move files between directories by changing the directory on the Media Object screen - the results are unpredictable.
Adding and Managing Media Objects
Adding Media Objects
You can add Media Objects to top level objects (People, Families and Sources) and to all Evants / Facts. Look for
- Add a new Media Item in Individual (Media tab), Family and Source editing screens, as well as in the Manage Media form.
- Add a new Multimedia Object in Event / Fact editing screen.
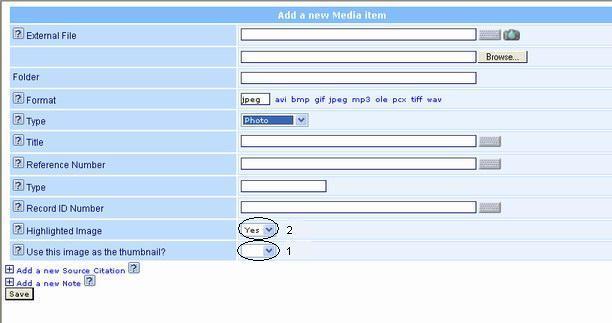
In each case you have also a choice to link to an existing Media Object. After clicking on one of those items, you will be presented with a Media Item screen with the following items:
- Enter a Person, Family, or Source ID - here you can add the first link. If you reached this form from a specific person, fmily etc. screen, this item is absent, as the link has already been created for you.
- Media File data - the file items as described above in the Uploading Media Files section. Note that instead of a file you can type an webpage Url into the File name on server field, creating a URL Media Object.
- Media Object data - Format, Type, Title, Note, Source, i.e. the Media Object data as described above.
Creating Media Objects from files
The Manage Media form displays both Media Objects and Media Files, using either the Media Object Title or File Name as sort and search filed. You can limit your display by entering part of the filename in the Filter field. You can distinguish the "naked" files by the lack of Media ID (a psition that looks like "(M283)", and lack of "Remove object" item on the left. Clicking the "Edit" will invoke the "Add new Media Item" screen, with the file name already filled in. Proceed by filling the data fields as described above, whhich should result in creating a Media Object.
Managing Media Objects
You can delete or rename a Media Object. The Delete option will not work if the object is liked to other items; you need to delete the link. Renaming is a little tricky, since there is a possibility of a collision with a name of another Media Object. The results are often unpredictable: the rename may not be succesfull or the object disappears, orphaning the file.
Associating Media Objects
Once a Media Object is created you need to associate it with some other item in Gedcom. This is done for you if you create the Media Object starting from a person, event etc., or you can associate it with the first top level object while creating the Media Object. You can make additional associations in two ways:
- Set Link From Media Object to a top level object
- You can display all the links to the Media Object on the Media display; you can reach it by clicking the Media Object Title when displayed with Persons, Families and Sorces, and on the Media List menu item (but not in Manage Media. There, as well as on the Edit Media Item screen you can access "Set Link" with 3 choices: "To Person", "To Family" and "To Source". Select and type in the ID or search.
- Set link To Media Object
- This method works for People, Families, Sources as well as for Events and Facts. The Link to an existing media item or Add a new Multimedia Object will lead you to a small form which gives you the option of typing in the Media ID or searching for Media Object.
- Remove the link
- There is no "Remove Link" in the Media Object editing screen. When you access the Media Object via "Manage Media", you have an option of removing all links (not individual ones). To remove an individual link, go to the item that is linked (Person, Family, Event etc.) and click Edit/Delete. You are not deleting the Media Object, only the link.
Places media can be used
Media Objects can be attached to top level objects: Individuals, Families, Sources, as well as to all Facts and Events. You can attach a Person, Family or Source to a Media Object, or an Object to Event, Person, Family and Source. One can force PGV to use one of these images as the main picture by setting the "highlight" option (see below).
Thumbnails
In Version 4,
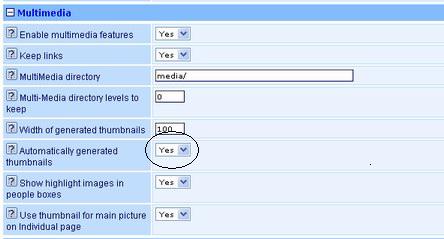
The main controlling setting for the use of thumbnails is in the GEDCOM Configuration, Media section, "Automatically generated thumbnails". When this is set to Yes, all images for the Individual's page use the thumbnail obtained by resizing the chosen image to the "Width of generated thumbnails". When set to No, the chosen image itself is used.
Rules for selection of image for display

The settings on all media files within the Indi page's Media tab help determine which image is chosen as the one to use for this individual. Here are the rules, straight from function find_highlighted_object() in functions.php:
Rules PhpGedView uses to decide which is the highlighted media object
- 1. "Use this image as thumbnail" (_THUM Y). The first object with this setting will be used regardless of the object's level in the gedcom record.
- 2. "Highlighted image" (_PRIM Y). The first object with this setting will be used if no _THUM Y exists regardless of level in gedcom record.
- 3. Other. The first level 1 object will be used (provided it doesn't have a _THUM N or _PRIM N setting) if there is not some other object with _THUM Y or _PRIM Y (level 1 objects appear on the media tab on the individual page).
Notes
- Rule #1 means that the "use this image as thumbnail" option overrides EVERYTHING. The image selected will be used in place of the thumbnail, without any resizing. The "Use this image as the thumbnail?" selection has outlived its usefulness and will be removed in the future.
- Rule #2 reflects the setting of the "highlight" option. This is useful when there are several images and it is desirable to make PGV use a specific one, or when one wants PGV to use an image that's attached to a Fact rather than one attached to the person's record.
- Rule #3 would be the usual case. To attach a media record to an individual, the Media tab on the Indi page would normally be used. Normally, one would leave the "Highlighted Image" and "Use this image as the thumbnail?" options unset. If there's only one picture added this way, no problem. If there is more than one picture in this fashion, the first one in the list is selected unless you force a selection using the "highlight" option.
Known Problems/Bugs
This section needs to be reviewed / corrected by knowledgeable developers.
Version 4.1
- Moving a file between directories leads to unexpected results. It should not be attempted.
- Upload Media File in User mode (not administrator) causes errors
